

How To Limit One Part Of A Model Animation In Blender
Export Animations from Blender to Unreal Engine 5
Overview
In this tutorial you'll larn how to export a elementary rigged/animated graphic symbol from Blender to Unreal Engine 5.
At a loftier level, this involves:
-
Preparing your animations in Blender for export
-
Choosing the right export settings and exporting to FBX
-
Importing to UE5 with the correct settings
This tutorial assumes basic Blender cognition and that you already have an animated model.
Preparing Your Blender Model
General Prep
-
Brand sure your top level object is Non chosen "Armature". If you leave the name as "Armature", you will get the error message: "Multiple roots are found in the bone hierarchy. We only support single root bone."
-
Tip: Double click to rename
-


-
Set the framerate to 30 FPS (if you had another FPS, the duration of your animations may need adjustment too)
-
Set the unit scale of your scene to 0.01 (Unreal Engine'due south default scale is centimeters)
-
Brand certain you utilise transforms to your mesh and armature so that your Calibration is (i, ane, 1) and Rotation (0, 0, 0). Object > Apply > All Transforms
Deportment
-
Brand sure your mesh has an armature with at least one animation.
-
Animations prove up as "Actions" in Blender and you can view your list of actions from the Dope Sheet > Action Editor window.
-
Click on the dropdown carte to see your list. If you desire to rename them, you can alter the text hither.
-
These actions will be exported in the FBX model and volition come up into Unreal as separate animation sequences.

Exporting from Blender
Now nosotros're going to export our mesh and animations from Blender so that they work in Unreal Engine 5.
This method will consign your mesh likewise as all Actions.
-
Select the armature and child object(s) that are animated by information technology.
-
From the bill of fare, click: File > Export > FBX (.fbx)
-
Change the post-obit consign settings:
-
Limit to Selected Objects [CHECKED]
-
Object Types: Armature + Mesh
-
Geometry > Smoothing: Confront (fixes the "No smoothing grouping information was establish in this FBX scene." error)
-
Armature > Add Foliage Bones [UNCHECKED]
-
Bake Animation > NLA Strips [UNCHECKED] (only needed if you created NLA strips)
-
-
Choose a filename and export (if following Unreal naming conventions, prefix your filename with SK_, e.g. "SK_MyCharacter.fbx")
Importing to Unreal Engine 5
-
Open the Content Browser (or expand the Content Drawer)
-
Create and/or navigate to the folder where you want to import your assets
-
Click the Import button
-
Find the FBX file you merely exported and click the Open up button
-
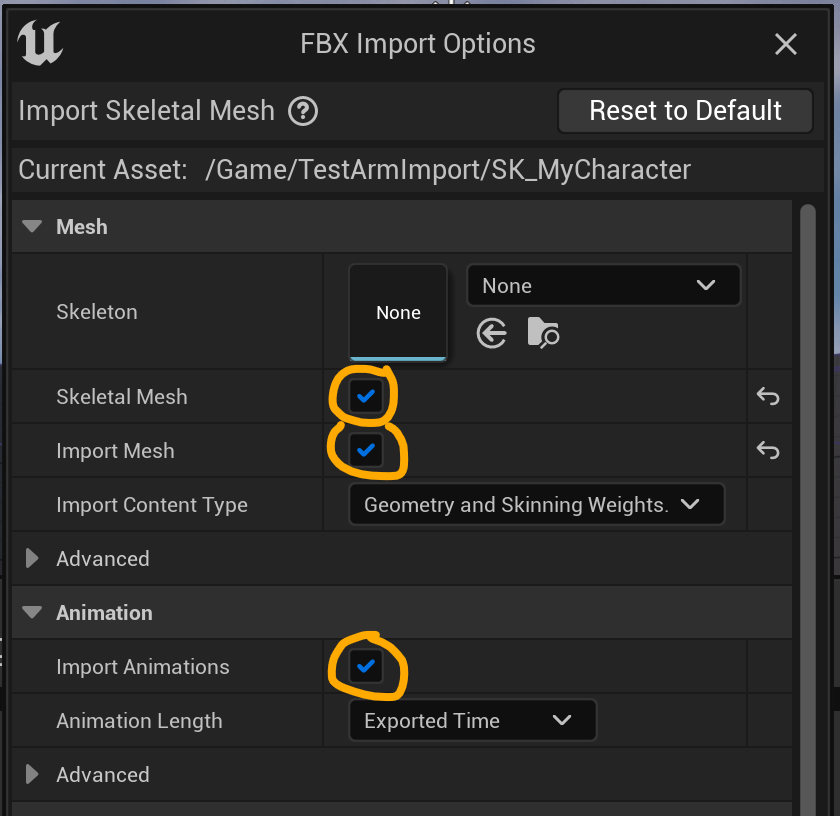
Cull the following FBX Import Options:
-
Skeleton: None
-
Skeletal Mesh [CHECKED]
-
Import Mesh [CHECKED] (you can leave this unchecked if y'all already have a mesh in your project and just desire to add more animations)
-
Import Animations [CHECKED]
-
Yous should now see a drove of assets in your content folder: a Skeletal Mesh, a Skeleton, a Physics Asset, and ane or more than Blitheness Sequences. This graphic symbol isn't exactly my best work. 😂

Source: https://www.immersivelimit.com/tutorials/export-animations-from-blender-to-unreal-engine
Posted by: deanclinter46.blogspot.com
0 Response to "How To Limit One Part Of A Model Animation In Blender"
Post a Comment