

What Can I Do With Grapes From My Garden
Grape plants are easy to propagate from cuttings.
Most of the time they are done during the winter months when the plants are dormant. Cuttings taken in the late fall and winter are known as hardwood cuttings because just as it sounds, the wood is much harder during the fall and winter than it is during the growing season.
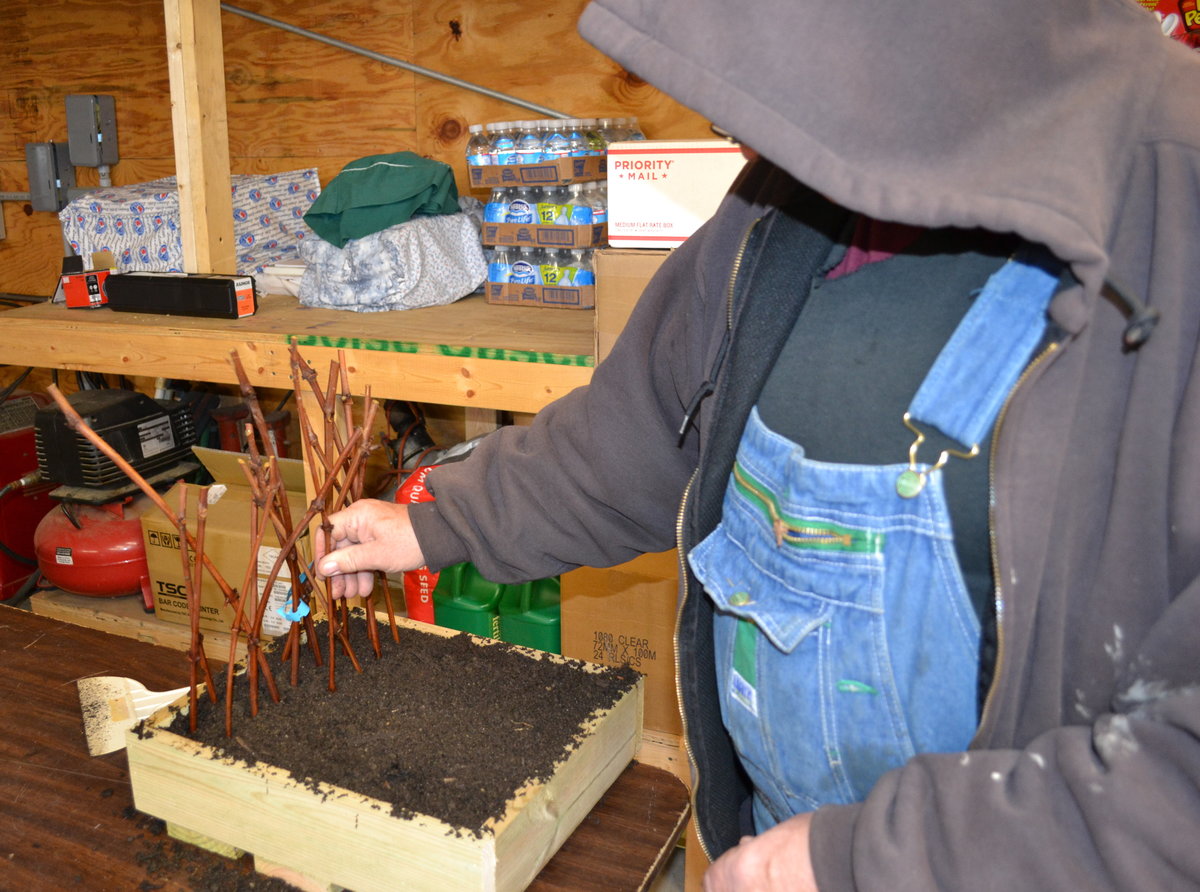
It must have been really cold the day that Duston and I took these photos and shot the video because we're inside the building and I have my hood up over my head like I just robbed a liquor store.
What you see is me sticking hardwood grape cuttings into a Homemade Plant Propagation Flat fill with a soil mix that is mostly peat moss with some perlite mixed in. Just about any potting soil will work for propagating grapes like this.
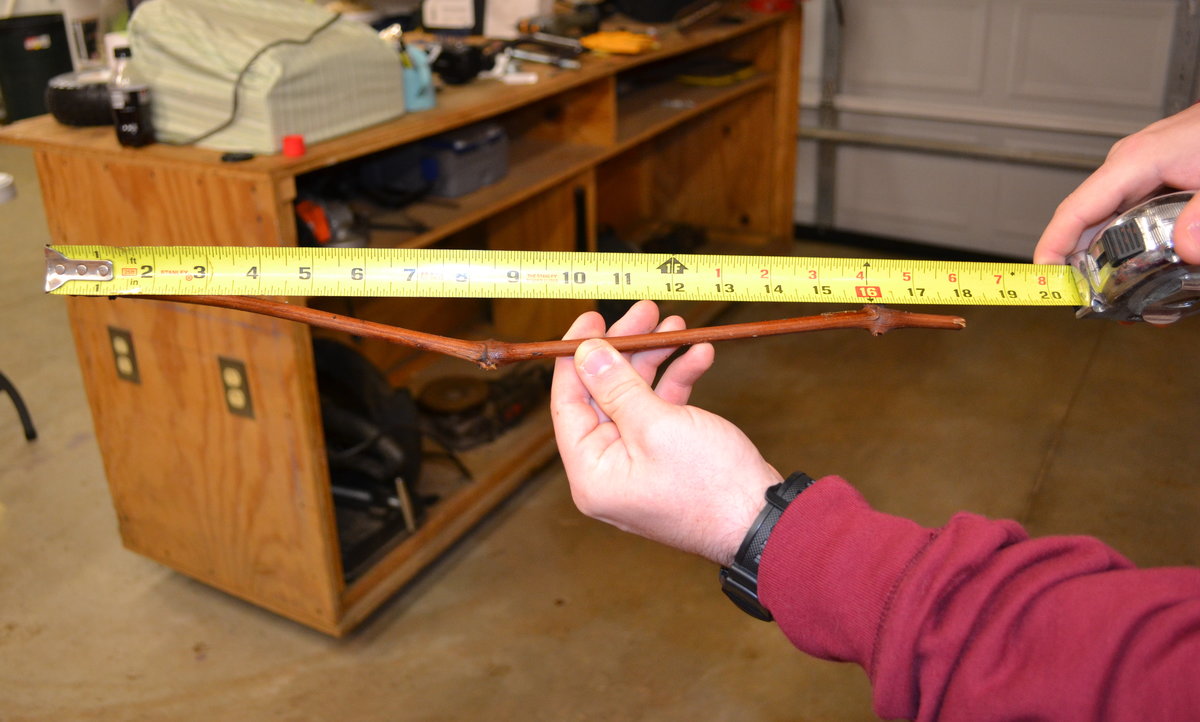
Unlike most cuttings, grape cuttings have to be really long because the buds are so far apart. The grape cutting that I am holding in this photo is 18″ long and it has to be that long because even at that length it only has three nodes.
A node is a bud union. See the bumps on the grapevine? One at each end and one in the middle? That's where new buds will appear next growing season. That's also where the roots are going to appear, right around and below the bottom node.
Grape plants grow like crazy, growing as much as 13 feet in one growing season. They grow so fast that the bud unions have a lot of space between them.
In order to make sure the grapevines produce high-quality grapes grape growers prune their vines heavily during the winter to reduce the number of grapes the vine produces the following growing season. Too many grapes on one plant makes for a lot of really bad fruit. So they prune to get less fruit, but really good fruit.
Grape growers throw away miles unwanted grapevines each season.
Most if not all of the grapevines that are removed from the vineyards are just tossed away or shredded and recycled. The grape grower really has no use for them. I used to work in a nursery that sold grape plants wholesale. The owner of the nursery would actually send a crew out to prune grape vines for some of the local vineyards, in exchange he got the vines they removed.
They'd bundle those vines into huge bundles almost 30″ in diameter and 12 or 13 feet long. They'd bring them back to the nursery and drop them outside of the workroom, out in the cold.
It was my job to drag those bundles inside, one at a time and cut the vines into individual cuttings. Cold, frozen grape wood is hard and I had to make 5,000 cuttings each day if I expected to get paid. Seriously, that's how I got paid. I was paid 8 hours of wages for 5,000 cuttings. That was my quota, and not hitting the quota wasn't an option.
Making grape cuttings is super easy. Take the entire grapevine in your hand. If you're right-handed the pruning shears will be in your right hand, the grapevine in your left. Start with the butt end of the grapevine, not the top of the vine.
You can usually tell the difference because the bud is thicker, then as you get to the other end, the very top of the grapevine, it gets much, much narrower. However, when you remove the vines from the plants in the vineyard, be careful to keep them all oriented in the same direction so you can't make a mistake.
With the grapevine in your left hand, the pruning shears in your right hand make your first cut about 1.5″ above the top node, then as you slide your hand down the vine remove and all side branches, usually curly cue looking things, then move to the bottom node.
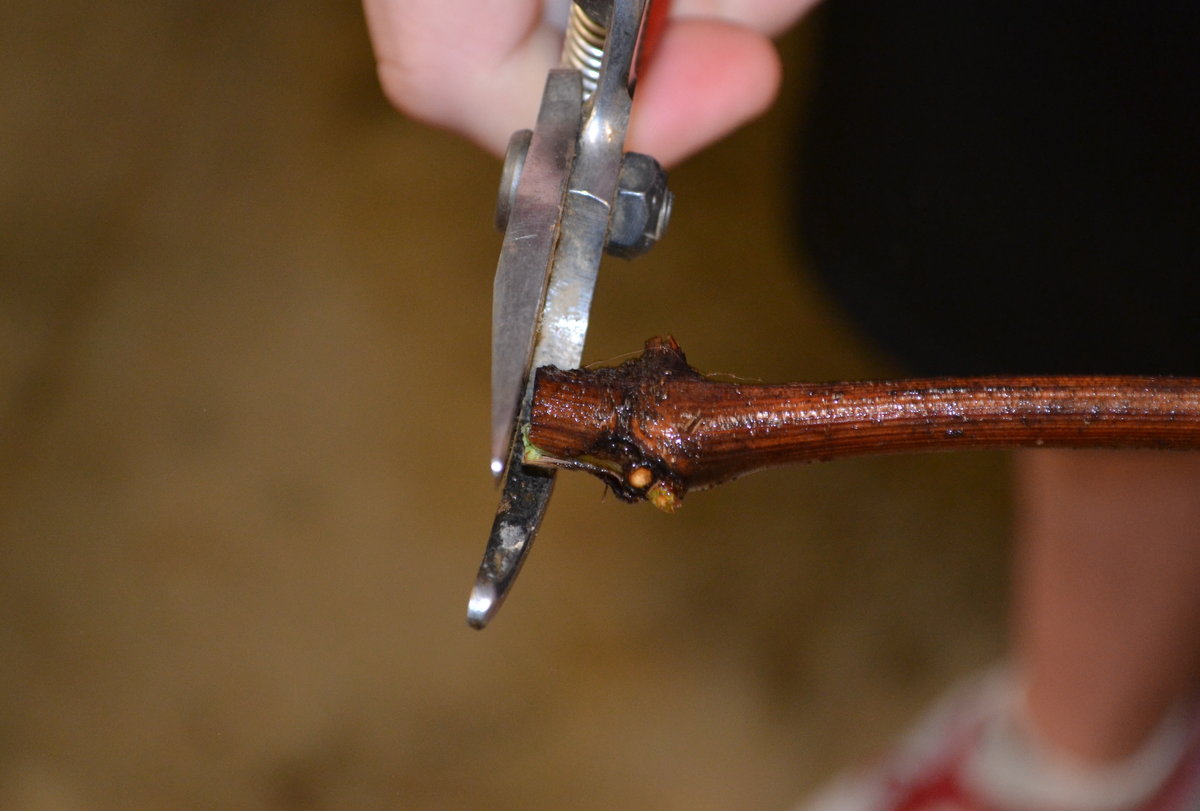
The cut at the bottom node is critical. You want to cut right below the bottom node, but not into the bottom node. This is where the roots are going to grow and if you damage the bottom node the cutting won't root.
But you don't want to leave a long stub below the bottom node because this part of the cutting will be in soil, and that stub will be nothing but dead wood-rotting underground. That's not good.

In the above photo, the stem below the bottom node is too long and needs to be cut off.
There! That's better. We've cut right below the bottom node but not into it. Roots will form all around this node.
Making the cut on the top of the cutting is less critical and you want to intentionally cut at least 1″ above the top node if not 1.5″ above the top node. That part of the cutting, the part that we are leaving above the node, will die back but we intentionally leave it long to serve as a handle and to protect the buds on the top node of the cutting.
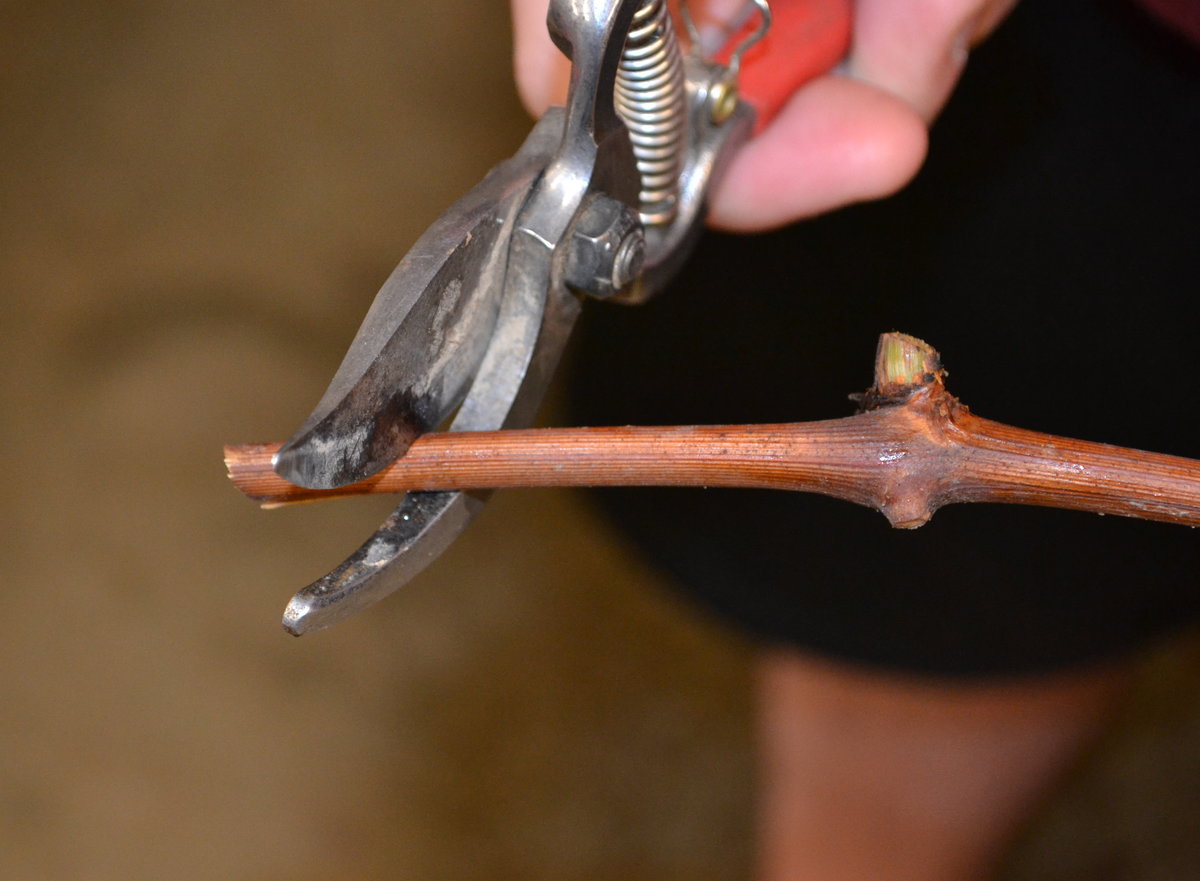
See how differently we treat the cut on the top of the cutting as opposed to the bottom of the cutting. This also helps you to tell the top of the cuttings from the bottom as you handle them. Should you drop a whole bundle of cuttings and they go everywhere, you will instantly know which is the top and the bottom.
Once you have your cuttings made the next step is to dip them in a rooting compound. I like liquid rooting compounds because you buy them as a concentrate then mix with water to the strength you need.
Hardwood cuttings need a stronger solution than do softwood cuttings. Don't worry about the details, the instructions are on the bottle. We often use Dip n Grow, but what brand of rooting compound you use really doesn't matter.
Powder rooting compounds are fine, they work just as well. They make powders for softwood cuttings and powders for hardwood cuttings.
Once you have dipped your cuttings in the rooting compound you can stick them outside your garden or you can stick them in a flat of potting soil like I am doing here.
Your cuttings will be perfectly fine outside in the cold and snow. They won't do a lot in the way of rooting until the temperatures get above 45 degrees F., but they will root come spring. Ideally, if you get about an 80% success rate you are doing good with hardwood grape cuttings.
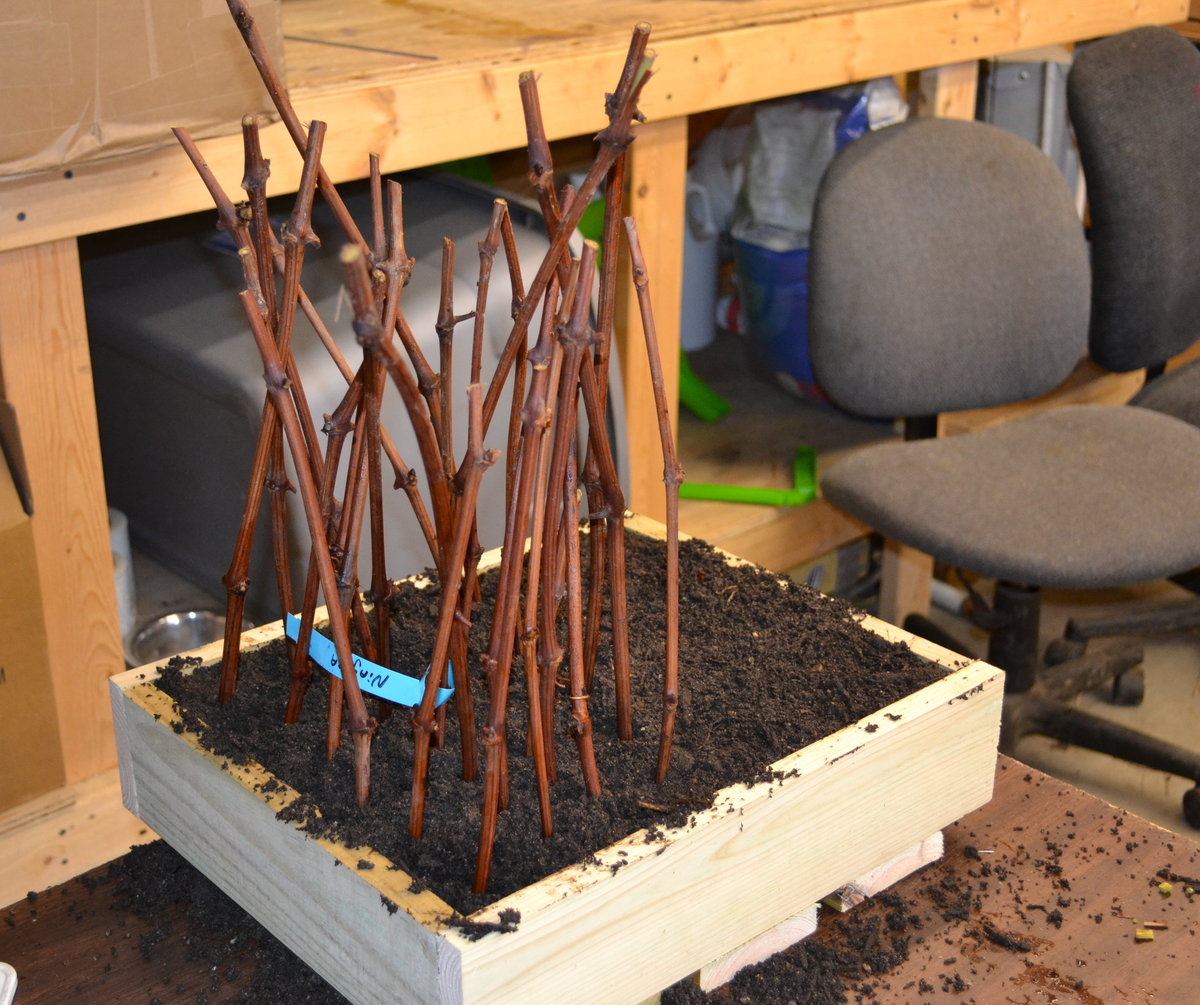
Once you have your cuttings in the flat pack the soil down tightly then water until the potting soil is thoroughly wet. Then move the flat outside. Do not leave the flat inside. If you do, the tops will start to grow before the cuttings have roots and they will all fail. They'll be fine outside in the cold.
If the soil in your garden is not frozen you can just stick the cuttings directly in your garden. Just take a spade and make a slice in the ground about three or four inches deep and stick the cuttings in the slit you made in the ground.
Pack the soil on both sides to make certain there are no air pockets around the base of the cuttings where you want the roots to grow. After that thoroughly water them in to moisten the soil and to help remove air pockets. After that just water as needed when it's warm and dry. If it stays cold they probably won't need any additional water.
Questions or comments post them below and I'll do my best to answer questions for you.
What Can I Do With Grapes From My Garden
Source: https://mikesbackyardnursery.com/2014/01/how-to-propagate-grapes-from-hardwood-cuttings/
Posted by: deanclinter46.blogspot.com
0 Response to "What Can I Do With Grapes From My Garden"
Post a Comment